Sunday, 15 November 2015

Steam Chocolate Cake

Well, the pie didn't last that long. It took us just two days to finish it off. :)

So, I was thinking....chocolate cake! Hehehe...but I want to bake a steam chocolate cake. It will be one damn moist cake. Plus..who don't love chocolate cake huh? It has been a while since I do one so here goes.

Mixture A;

- 1 cup of brown sugar
- 1 cup of cocoa powder
- 1 cup of vegetable oil
- 1 cup of hot water
- 1 cup of condensed milk
- 1/2 cup of milo ( Thank God I brought a HUGE pack of milo from KL when I came here)
- 1 tsp of coffee
- 3 eggs
- 1 tsp of vanilla extract

Mixture B;

- 2 cup of flour
- 1 tsp of bicarbonate soda
- 1 tsp of baking powder

1. Mix all the wet ingredients (A) in a mixing bowl. And the dry ingredients (B) in a different mixing bowl. 

2. Add the dry ingredients into the wet ingredients and mix well. 

3. Pour the batter in a cake pan & steam for 1 hr. 

How simple is that! The cake is not sweet, believe me on that. It has this bitter chocolaty taste, which I love very much. If you want to add a little bit of sweetness..add some topping. If you prefer not to..well, the choice is yours. 

My topping is very simple. I just heat some cream on a pan over a medium heat. Once it simmer, add the cream to a bowl of chocolate chips or button. Mix well until all the chocolate melted. Cool it off for 5-10minutes. Then pour it on top of the cake. Finish it off with some cake sprinkle.


Look at that chocolate flow...:)


Enjoy the cake!


Banana Toffee Pie..aka..Banofee Pie

I saw it on Jamie Oliver 30 minute meal programe one evening and I told myself..I just got to do it. It look so deliciously sinful! Plus..it is very easy to do.

So, I google the recipe the next day but there are things in the ingredients that I just don't have at the moment. I need to improvise. In baking or cooking, you need to learn to improvise as you're sure not going to have every ingredients in your pantry every single day ..unless you run a supermarket. :)

Anyway..here are the things you need;

To make the pie crust;
- 13/4 cup of flour
- 2 tsp of granulated sugar
- 3/4 tsp of salt
- 6 tbsp cold butter, cut into cubes
- 1/4 cup of shortening ( I replace this with butter)
- 7 to 8 tbsp ice cold water

1. Mix flour, sugar & salt together. Use your hand, mix all the butter (since I do not use shortening) in the dry mixture. Mix it until it comes together in a clump when you squeeze it.

2. Drizzle in ice cold water and rake through mixture until finger is moist. Add the ice cold water one tbsp at a time. Dough is moist enough when it is moistened through but not wet when it is press. Do not overwork the dough or else it get too hard.

3. Wrap the dough in a string wrap and press it into a flat disk. Place it in the refrigerator for 30 minute. 

4. After 30 minute, place the dough in a pie pan. Press it gently on the pan. Press the base of the crust with fork to release the trap air. Then place aluminium sheet on top of the crust and weigh it down with some beans..I'm using red bean. This is to prevent the crust to raise up when baking. Bake it for 20-25 min in a 190C. 

For the toffee filling;

- 1 can of condense milk
- 70 gm ( 1/3 cup) of brown sugar
- 50 gm butter

1. Cook all the ingredient in a pan over a medium heat. Stir it constantly until it is brownish in colour and until it is thickened. Do not let it boil or burn. 

2. Let it cool of a bit for 5 minute and then pour into the baked pie crust just now.

For the topping;

- 1cup of double cream
- dashes of chocolate

1. Whipped the cream until it thickened. If you using double cream, it won't take you long to get the thick mixture. 

2. Pour it on top of the toffee filling as much as you like. Then top it with dashes of grated or roll chocolate.

There you goes. This is my improvise recipe ok. If you want the original one, you can look for it in Jamie Oliver 30 minute meal. Happy trying!


And there goes one slice..


For those who are on diet...tengok gambor jer la ok..heheh..and telan air liur..heheh..


Thursday, 12 November 2015

Sweet potato pancake

I bought some sweet potatoes from the supermarket few weeks ago. Damn..that was an expensive buying. It cost me RM10 for a piece...a piece! If it was in Malaysia, sorry la aku mau nangga..dek2 gik mau beli. But since diri ku ini perantau..beli jak laa..nama dah teringin. 

So I boiled the sweet potato. Then it cross my mind to introduce sweet potato to my son. I wanted my son to be 'universal' like me. Hhehe..so later on, he won't be asking for pasta when we're in the longhouse! Hahahha...

Fikir punya fikir..finally, I decided to do him some pancake for his breakfast. So here's the recepi. You need,

- 2 tbsp of butter, melted
- 1/2 cup of cooked sweet potatoes, mashed
- 1 egg 
- 1/3 cup of all-purpose flour
- 1/2 tsp of baking powder
- 1/4 cup of milk ( you can add more if the batter is too concentrate)

1. Mix the sweet potatoes in a mixing bowl with egg. Stir in flour and add the baking powder.

2. Add the milk, up to 1/3 cup of milk while stirring. Stir in 1 tbsp butter.

3. The batter should be thick and lumpy. Not too runny.

4. Place a non-stick pan on medium heat and add 1/2 tbsp butter. Spoon batter into the pan and cook until bubbles rise to the surface of the pancakes and break. Approx. 1 to 2 min. 


This batter produced 6-7 small pancakes. If you want to make bigger size pancake..probably you need to double or even triple the portion. :)

My son enjoy it very much and so do I! Hahhah...


Sunday, 8 November 2015

Winter is coming

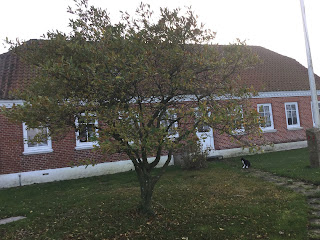
How time flies..now we are approaching the end of 2015 and as the end is coming..so is winter! Most of the tree has shed its leaves. Therefore, our compound are full of dead leaves..not really a beautiful sight..but what to do..


But I kindda love to see all the 'leaveless' tree...


This year, I must say, it is quite a mild autumn. We still experience sunshine most of the day and the temperature is still double digit. Normally, when it is November, the temperature hardly be more than 10C. We experience more rainy days as we enter the month of November but not so much as I has expected and not as much as compare to previous year.


One of those moment when the field is clear..so I can see my neighbour ...yes..that house over there is my nearest neighbour..huhuhu..


This is the time for HIBERNATION! Hhahah...I would love to run outside but nowadays, my body not as 'leathery' as it use to be. Age is catching up I guess and the cold just get to your bone. So better keep myself warm inside and just play with the lil' one. Since it is his first winter,I do not know how he will take it so I just want to be on the safe side and keep him warm inside. Hehhehe..


No gardening has been done this year for me as I arrived here at the end of summer. No point of planting anything besides potato because soon, they will all wither due to the cold weather. But my chilies and lemon plant are already indoor now. Won't want to leave it outside. So sure DIE!

 Therefore, explain the empty 'man made greenhouse'..I keep my tomato and chili plant inside but now..its all indoor.
This is my strawberry 'area'. This year it has bear me lots of berry and I hope next year, it will multiply its harvest. :)

Last night we experienced a strong storm, hence...this is what happen to my flower...hhhuhu...bunga kecundang...


Oh..since it is November...I guess it is time to get the house ready for CHRISTMAS! And we just purchase our first santa ..


Saturday, 7 November 2015

I love my job

Some people asked me, what do I do or what is my day to day job like. They heard the job title but for those who are not in the academic line, 'post doctorate researcher' doesn't even ring a bell. It is something you do after you finish your PhD though the position is not that popular with local PhD holder. Why? Well..because normally the post is just temporary..like a contract worker I must say. For an obvious reason, most PhD holder I know will prefer to have a stable, steady and permanent income. Therefore, a full time lecturer is a much more attractive job to apply.

Well, brief introduction...the job include lecturing, researching, academic writing for publication in high impact journal, authoring, supervising and of course administrating tasks. Basically, you need to be good in multi-tasking and extremely good with time management. Sound similar to a lecturer's day to day job right...well..like the Thai say..same2 but different...hehehhe..For a post doctorate..our main task is research and publication. We do need to supervise students or giving lecture but only when needed.

I do not need to have punch card hence, I can come and leave the office anytime I want as long as my task for the day is completed. I work on my own schedule and time as I create my own dateline. I can work anywhere basically..library, bus stop, home office, coffee shop, toilet..hheheh..and I do work anytime including weekend..public holiday..festive season..during confinement or wee hour in the morning. What I need most in order to be fully functioning is my BRAIN and LAPTOP .. and of course INTERNET!

Wow.."what a nice job"..one of the most common comment I get from most people. Yeah...bagus la sangat. U need to have a high self discipline if you want to do what I do. Why..because there's no one to monitor you...publication has no dateline hence, you need to set your own dateline..you need to create your own schedule in order to fulfil the university requirement...no one to guide you because as a PhD holder they expect you to be an expert so expectation is very high .. and you need to read & write a lot...seriously a lot! By the end of the day, they want RESULTS. If you wish to keep your job and get an extended contract..you need to deliver GOOD RESULTS.

For those who think the task is easy..well..you are welcome to give it a try. Conclusively, every job in this world is stressful and hard. There is no easy and stress free job. Even being unemployed is stressful okkk...As long as you love what you doing, the rest doesn't matter. As far as I know..I love my job & I hope I can do it for another 2 years..yes, the job do come with an expiration date. :) What's next for me..I don't know..we'll see...:)

Friday, 6 November 2015

Homemade red bean bun

I've made the red bean paste and now it's time to bake my red bean bun. I do not use all my paste because I intended to bake two different type of red bean bun but not at the same time. Buat banyak2 sape nak makan since hubby do not like bun with any filling. Dia suka bun kosong jer. This one, I'll make the bun in a shape of flower..well..that is how I see it la..cam bunga. Anyway, here's the ingredients you need. This recipe will yield about 16 red bean buns;

- 31/2 cup of flour
- 21/2 cup of red bean paste (since I also bake normal dinner roll, so I don't use this much of red bean paste. but if you intend to do 16 red bean paste, you need at least this much)
- 2/3 cup of lukewarm water
- 2/3 cup of lukewarm milk
- 1/2 cup of sugar
- 1/4 cup of butter, melted
- 2 tsp of dry yeast or 20gm of fresh yeast
- 11/2 tsp of salt
- melted butter for brushing
- poppy seed or sesame seed

1. Mix the flour, yeast ( if you using dry yeast), sugar and salt together. Slightly mix all the ingredients.

2. Add the lukewarm water & milk, and mix well either using a spatula or hand mixer. When you already form a dough, make a well in the middle of the dough then pour the melted butter into it.

3. Knead for another 30 minute until the dough is smooth and elastic. Leave the dough for an hour or longer, until it double it size.

4. Divide the dough into few small ball. You can weigh each dough if you want your bun to be the same size.

5. Flatten the dough with roller then place the red bean paste in the middle. Close up the dough. So nanti it will look like ball. Then flatten the dough by pressing with your finger. Bahagian yang ditutup tadi mesti the opposite side yer. Jangan plak uols tekan permukaan yg ditutup tadi. Abis kluar red bean paste nanti. Hehhehe

6. Then using kitchen scissor ( I just use pizza cutter), cut the flatten dough tadi into 8 bahagian..susah nak explain ni. Hehhe..potong tu jgn smp abis..leave the bahagian tgh tu nyer. Cam ni haa..


7. Add poppy seed on top if you feel like it...


8. Then leave all the bun for 40 minutes  so it will kembang skit. Lepas tu bake it for 20 minute in a 185C temperature.


Marvellous di makan panas2! Yummy..selamat mencuba.

Wednesday, 4 November 2015

Sweetened Red Bean Paste

I was chatting with a friend the other day and she told me she is baking buttermilk bun. Gosh..how I love buttermilk bun but unfortunately, I can't get it here. Heck..I can't even get it in KL as Kuching is the only place is selling that bun. Each time I go back home, I am sure to get few pack of those buttermilk bun and Taka is my favourite place to get it. :)

Since I can't make buttermilk bun, I thought I might as well bake red bean bun, which is also one of my favourite bun. At least this one, I can bake but I need to make the red bean paste first. Lucky for me, I have a pack of red bean in my cabinet. So, project bermula...hehehe..

You need;

- 1 cup of red bean
- 1/2 cup of brown sugar
- 11/2 tsp of vege oil

Yes. That's all you need. This portion will produce yield 11/2 cup of red bean paste.

1. First you need to soak the red bean in cold water and leave it over night.

2. The next morning, you drain the water and placed it in a pot @ saucepan, and at 3 cups of cold water. Heat the bean under medium heat and let it simmer for 1 hour or until the bean is soft. Make sure the water does not dry up so you need to monitor it.

3. Drain and discard the water. Placed the bean in a food processor ( if you have one) or blender will do. I use blender as I don't have food processor. Add the brown sugar and blend.

4. In a saucepan, add the vege oil and heat the pan. Add the bean paste and stir for 5 minutes or until the paste dry. Let it cool then store it in a container. You can store it for a week.

There you go. I didn't expect it was that easy to make red bean paste. Hheeh...so tomorrow, I will make my red bean bun! Yummy...


Orange pound cake

One day..I was craving for orange or lemon cake. So, that evening I head off to the supermarket & buy some oranges. I normally bake lemon poppy seed cake but this time, I guess I go with orange.:)

But sorry yeah...no picture. Too busy getting the cake done & entertaining the lil' one who is constantly on my feet or rummaging stuffs in my kitchen cabinet!! Here's the ingredients;

- 2 stick unsalted butter (226 gm)
- 2 cups of granulated sugar
- 4 eggs
- 1/3 cup of grated orange zest ( u need around 6 oranges)
- 3 cups of flour
- 1/2 tsp of baking powder
- 1/2 tsp of baking soda
- 1 tsp of salt
- 1/2 cup of freshly squeeze orange juice
- 3/4 cup of creme fraiche
- 1 tsp of vanilla extract

1. Cream the butter with sugar together until light & fluffy. Then add the egg one at a time. Add the orange zest.

2. In another bowl,sift the flour with baking powder, baking soda and salt.In a different bowl, combine the orange juice,creme fraiche and vanilla. Add the flour and creme fraiche mixture into the batter alternately. Beginning with the flour and end with flour. Divide the batter evenly into two pans ( If you only use one load pan, divide the ingredients into half ok..)

3. Bake the cake in a 185C for 45 min to 1 hr. Let the cake cool for 10 minutes and there you goes...u have your orange cake! 

Enjoy it with a hot cup of coffee or tea. Simply marvellous!